What is a Chromebook?
A Chromebook is a laptop computer that runs an operating system known as Chrome OS. Chromebooks work well with Google Apps for Education. The Chromebook devices are affordable computers that pack powerful punches, allowing students and teachers to create, share, and learn. Chromebooks do not run typical applications (think Microsoft Office Suite) but do have a lot of applications and extensions that enhance the power of Google Apps for Education Programs.
Chromebooks are fantastic devices in education and level the playing field for all students with the power of technology.
Chromebooks are fantastic devices in education and level the playing field for all students with the power of technology.
Getting to Know Your Chromebook
Your Chromebook is very similar to other laptops and computers. On the exterior of the Chromebooks, you will find your USB ports, a power adapter input, expandable storage (microSD), a headphone jack, and a DisplayPort (HDMI). These are standard on many of the different laptops available from manufacturers. The inside is what really sets the Chromebooks apart from other computers. One thing that is really cool about the Chromebooks is that they contain no moving parts! Using Solid State Flash Storage and not needing a fan, the Chromebooks are solid with no moving parts! That means, less to break! Chromebooks also have incredibly long battery life and boot rapidly (less than 8 seconds!).
When using the Chromebooks, you will notice a few changes to the design of the keyboard and the desktop. First, I want to introduce you to the keyboard of the Chromebook.
You will likely notice some of the top keys are different and there is a lack of “Caps Lock.” Along the top, you will find the function keys of the keyboard. These keys perform specific tasks. The first three keys, the left facing arrow, the right facing arrow, and the circular arrow are browser functions. The left arrow will take you back a page, the right facing arrow will take you forward a page, and the circular arrow will refresh your current browser page.
Next, you have a square with arrows in the corner and a square next to two vertical parallel lines. The square with the arrows in the corner will take your current window to full-screen mode. The square with the parallel vertical lines will show you all open windows, allowing you to close out ones that you do not use or quickly switch the one that you need.
The next two buttons on the keyboard, the small gear and the larger gear, will control how bright your Chromebook’s screen is. This is an excellent tool to use to control the life your battery as well. Just the right of the gear buttons you will see a speaker with a line through it, a speaker with one curved line, and a speaker with two curved lines. These are the volume controls for your Chromebook. The line through the speaker is your mute all sounds. The single curved line is to lower the volume, and the two curved lines are used to raise the volume on the Chromebook.
The very last key on the function key line is your power button. This is how you can turn your Chromebook on and off easily. Remember, your work saves automatically with the Chromebooks, so there is no need to make sure that your work has saved before shutting down your device. As a teacher using the same Chromebook, you do not have to shut down each time. It is recommended that students restart the Chromebooks each time they switch. This is to ensure everyone has signed out!
Now, the one other significant difference in the keyboard of your Chromebook is the magnifying glass where the “Caps Lock” key would be. This is an easy keyboard shortcut to launch the App Launcher or do a fast search. Pretty cool, huh?
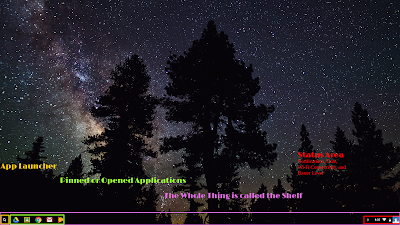
Finally, on your screen, I want to help you identify some of the features on the screen of your Chromebook to help you use if more efficiently and build some common vocabulary. For starters, you will notice a small circular object in the lower left-hand corner. This is like the magnifying glass button on your keyboard, as it does the same thing as the button. It will take you the launcher and allow you to do a quick search.
The circular object or magnifying glass, depending on the version of Chrome OS that you are using, is located on what is known as the “Shelf.” The “Shelf” is where you will find your pinned applications along with applications that are currently open. This can be used to quickly switch between multiple applications. At the far lower right-hand corner, you have your status area. This is where you will get notifications, see the time, and battery status of your Chromebook. If you click on it, it will allow you to access frequent settings and allow you to get to the settings menu.
The settings menu is where we will pick up in the next Comet Tech. |
So, if you took the advice of last week's 90 Second Chromebook Tip & Trick and abandoned your "Search" key in favor of Caps Lock on your Chromebook keyboard, this is still a quick way that you can search Google using this week's Shortcut of the Week. When you want to quick search Google, simply press "Ctrl + e" to focus on the URL bar at the top of the page and begin your Google Search query. It is extremely easy and fast to do!


Comments
Post a Comment