Updates to G Suite February


G Suite Updates


Google Suite is always updating and changing things. This post is to help identify some of those changes.

Jump Right to the Template

G Suite has streamlined the process for opening a template! No longer do you need to go to the template gallery, now you can do it right from the G Suite page. Simply hit new and select the type of document that you want. Hover over the document type to allow you to open and then select the option to open it from the template. Check out the screenshot to see. 

G Suite Choose from Template

Insert Videos from Google Drive into Google Slides

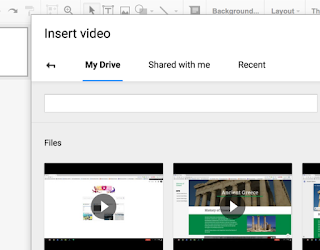
Google Slides would only support YouTube videos. Now, with a new update, Google Slides will support videos from your Google Drive. No longer do you have to upload a video to YouTube, but you can easily just keep videos on your Drive. 

New Options

Drive Video Files!


Comments

Popular posts from this blog

Chromebook Shortcut of the Week - 10/14/2016

This weeks shortcut of the week is to help you project your Chromebook. Due to resolutions, your Chromebook will likely default to the “Extended Screen” mode. If they happens, you will see your desktop background on the screen upon plugging in your Chromebook (your Chromebook needs an HDMI connection, if you need a cable, I can get you one!). In order to change this, you will use the “Ctrl + Full Screen” button. This will quickly switch between the two modes, allowing you to switch back and forth. A quick word to the wise, the extended screen is usually to the right!

Google Apps Update - Columns in Google Docs

Awesome news! Google Docs now supports columns of text! Seriously! Just this week, Google announced and updated Google Docs to include support for columns when working within Google Docs. To get there, it is incredibly easy! Step 1:  Highlight the text that you wish to place into columns. Haven't started working yet? Skip the first step! Step 2: Click on the Insert option on the menu bar in Google Docs. Locate and select columns. Step 3:  Select the columns that you wish to have. You have the option for a single column (as the Google Doc is likely already set up), two columns, three columns, or more options. Currently, the maximum number of columns supported is three. Step 4: Check out the new columns in your document! Questions? Please do not hesitate to ask!

How to Use Google Cast - Wirelessly Display Your Chromebook!

First and foremost, the headline is slightly misleading as you will actually display your Chromebook to your desktop which will be connected with wires. While you will need your Windows PC to connect to the projector, it does not change the fact that you can wirelessly display your Chromebook to students. In my experiments with this both at home and on the school network, I have yet to get the sound to work. (If you would like to connect with the HDMI cable that supports both audio and video, please let me know and I will be sure to get you a cable). To start this process, in your Chrome browser you will need to visit the Chrome Web Store and install the Google Cast for Education app. You will also need to install the Google Cast extension. Next, on your windows desktop open your Google Cast for Education app. You can find it near the top of your browser window. Once you open the app, you should be see a gray screen that names the computer and gives ...