
Don't Be Scared of Your Email - Controlling Your Inbox - Part Three - Using Filters

Part Three - Creating and Using Filters

Did you miss part one? What about part two?


Taking the idea of labels one step further, you can have your GMail automatically direct your emails into the labels that you created, even bypassing your inbox entirely! The upside that your inbox stays incredibly organized. The downside is that you will have to be sure to keep an eye out for important emails that might land there.

For steps on creating and setting up your filters, see the steps below.

  1. Go to Settings.

Screenshot 2016 10 24 at 2.16.51 PM.png


  1. Select “Filters and Blocked Addresses”

Screenshot 2016 10 25 at 8.38.07 AM.png

  1. Scroll down to create new filters

Screenshot 2016 10 25 at 8.40.35 AM.png

  1. Begin setting parameters for your new filter. When you are working, you can search using the Magnifying Glass. To proceed, you must select the “Create Filter with This Search.”

Screenshot 2016 10 25 at 8.44.18 AM.png

  1. Once you have set the parameters of your filter, you can easily begin to filter the emails and lessen the load on your inbox.

Screenshot 2016 10 25 at 8.48.11 AM.png


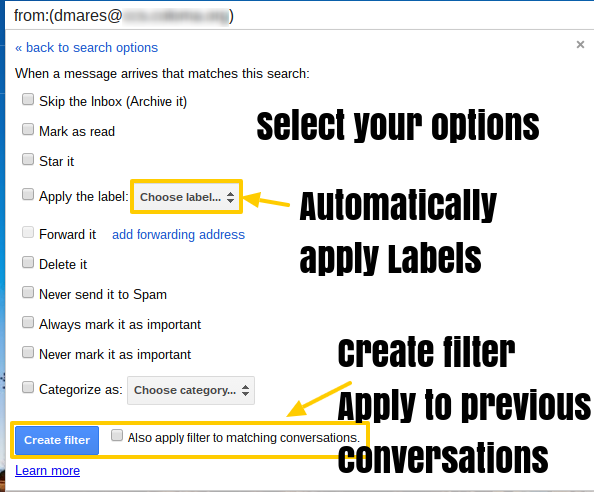
  1. Now that you have the filters set, you can create more to manage even more of the email load.

Hopefully you can leverage the amazing power of filters and labels in your email management. Stay tuned as there will be some bonus tips on using email and strategies to help maximize the efforts of managing our emails.

Comments

Popular posts from this blog

Chromebook Shortcut of the Week - 10/14/2016

This weeks shortcut of the week is to help you project your Chromebook. Due to resolutions, your Chromebook will likely default to the “Extended Screen” mode. If they happens, you will see your desktop background on the screen upon plugging in your Chromebook (your Chromebook needs an HDMI connection, if you need a cable, I can get you one!). In order to change this, you will use the “Ctrl + Full Screen” button. This will quickly switch between the two modes, allowing you to switch back and forth. A quick word to the wise, the extended screen is usually to the right!

App Highlight - Grasshopper

Grasshopper is a relatively new app from Google's Area 120. It is available on both the Android and iOS operating systems. In this app, you complete challenges through writing bits of JavaScript.  I like to compare it to Duolingo, the popular language learning app. It is free and allows you to work on the puzzles at your own pace. This is a step up from the Blockly coding that has been popularized by Hour of Code and Code.org. The best part is, you get nearly instant feedback and multiple tries to master the material. While this will not get you a Silicon Valley coding job by itself, it will definitely start you down a path that allows you to start growing your coding skills.  It is really worth checking out. Learn more at here .

Google Apps Update - Columns in Google Docs

Awesome news! Google Docs now supports columns of text! Seriously! Just this week, Google announced and updated Google Docs to include support for columns when working within Google Docs. To get there, it is incredibly easy! Step 1:  Highlight the text that you wish to place into columns. Haven't started working yet? Skip the first step! Step 2: Click on the Insert option on the menu bar in Google Docs. Locate and select columns. Step 3:  Select the columns that you wish to have. You have the option for a single column (as the Google Doc is likely already set up), two columns, three columns, or more options. Currently, the maximum number of columns supported is three. Step 4: Check out the new columns in your document! Questions? Please do not hesitate to ask!